linux-kernel - RIP Tutorial1: linux-kernelをいめる...
15
linux-kernel #linux- kernel
Transcript of linux-kernel - RIP Tutorial1: linux-kernelをいめる...
linux-kernel
#linux-
kernel
1
1: linux-kernel 2
2
2
Examples 2
2
2
3
2: Linux Hello World 4
Examples 4
4
4
3: LinuxFIFO 6
Examples 6
Named PipeFIFO 6
4: 7
Examples 7
I2C 7
5: 8
8
Examples 8
8
6: 10
Examples 10
fork 10
7: 12
12
Examples 12
FTDI USB "" 12
13
You can share this PDF with anyone you feel could benefit from it, downloaded the latest version from: linux-kernel
It is an unofficial and free linux-kernel ebook created for educational purposes. All the content is extracted from Stack Overflow Documentation, which is written by many hardworking individuals at Stack Overflow. It is neither affiliated with Stack Overflow nor official linux-kernel.
The content is released under Creative Commons BY-SA, and the list of contributors to each chapter are provided in the credits section at the end of this book. Images may be copyright of their respective owners unless otherwise specified. All trademarks and registered trademarks are the property of their respective company owners.
Use the content presented in this book at your own risk; it is not guaranteed to be correct nor accurate, please send your feedback and corrections to [email protected]
https://riptutorial.com/ja/home 1
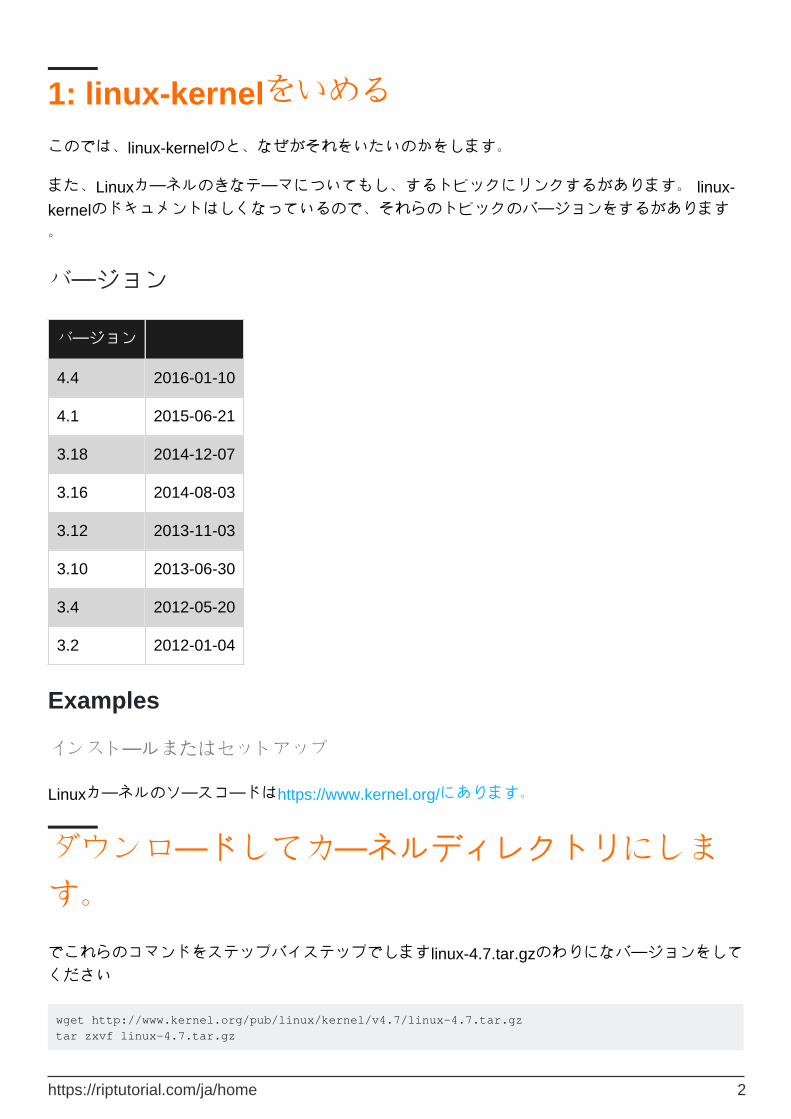
1: linux-kernelをいめるこのでは、linux-kernelのと、なぜがそれをいたいのかをします。
また、Linuxカーネルのきなテーマについてもし、するトピックにリンクするがあります。 linux-
kernelのドキュメントはしくなっているので、それらのトピックのバージョンをするがあります。
バージョン
バージョン
4.4 2016-01-10
4.1 2015-06-21
3.18 2014-12-07
3.16 2014-08-03
3.12 2013-11-03
3.10 2013-06-30
3.4 2012-05-20
3.2 2012-01-04
Examples
インストールまたはセットアップ
Linuxカーネルのソースコードはhttps://www.kernel.org/にあります。
ダウンロードしてカーネルディレクトリにします。でこれらのコマンドをステップバイステップでしますlinux-4.7.tar.gzのわりになバージョンをしてください
wget http://www.kernel.org/pub/linux/kernel/v4.7/linux-4.7.tar.gz tar zxvf linux-4.7.tar.gz
https://riptutorial.com/ja/home 2
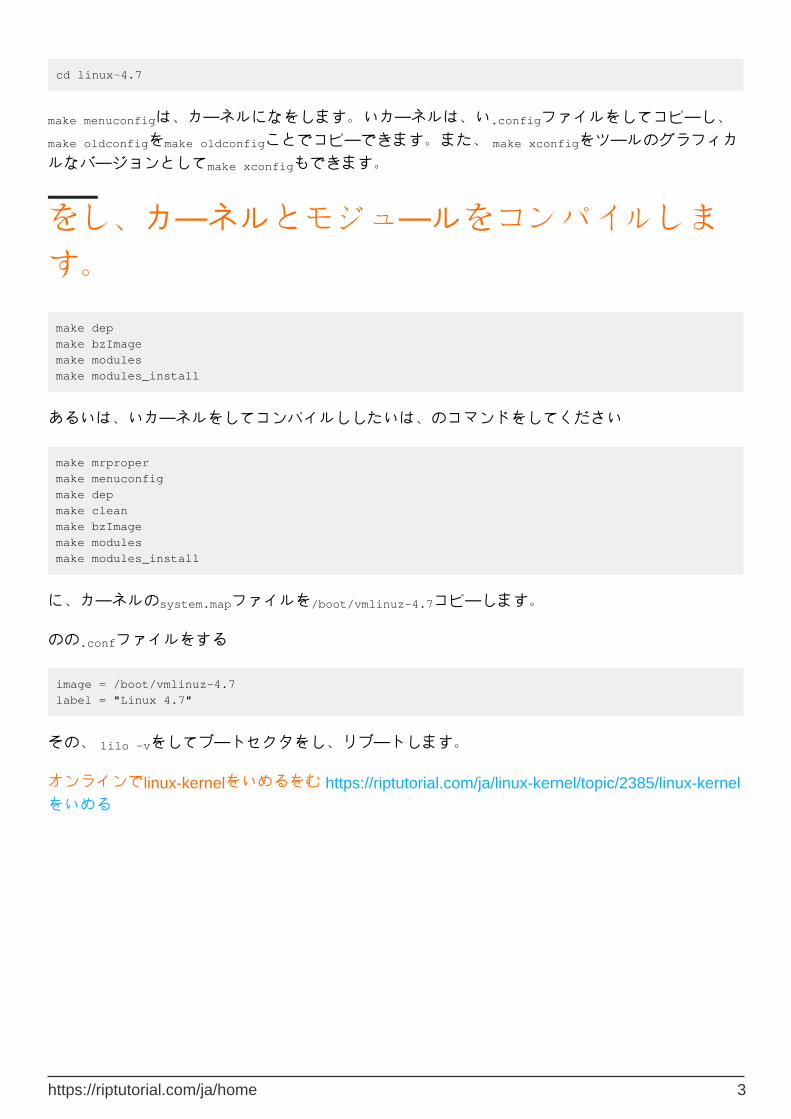
cd linux-4.7
make menuconfigは、カーネルになをします。いカーネルは、い.configファイルをしてコピーし、 make oldconfigをmake oldconfigことでコピーできます。また、 make xconfigをツールのグラフィカルなバージョンとしてmake xconfigもできます。
をし、カーネルとモジュールをコンパイルします。make dep make bzImage make modules make modules_install
あるいは、いカーネルをしてコンパイルししたいは、のコマンドをしてください
make mrproper make menuconfig make dep make clean make bzImage make modules make modules_install
に、カーネルのsystem.mapファイルを/boot/vmlinuz-4.7コピーします。
のの.confファイルをする
image = /boot/vmlinuz-4.7 label = "Linux 4.7"
その、 lilo -vをしてブートセクタをし、リブートします。
オンラインでlinux-kernelをいめるをむ https://riptutorial.com/ja/linux-kernel/topic/2385/linux-kernel
をいめる
https://riptutorial.com/ja/home 3
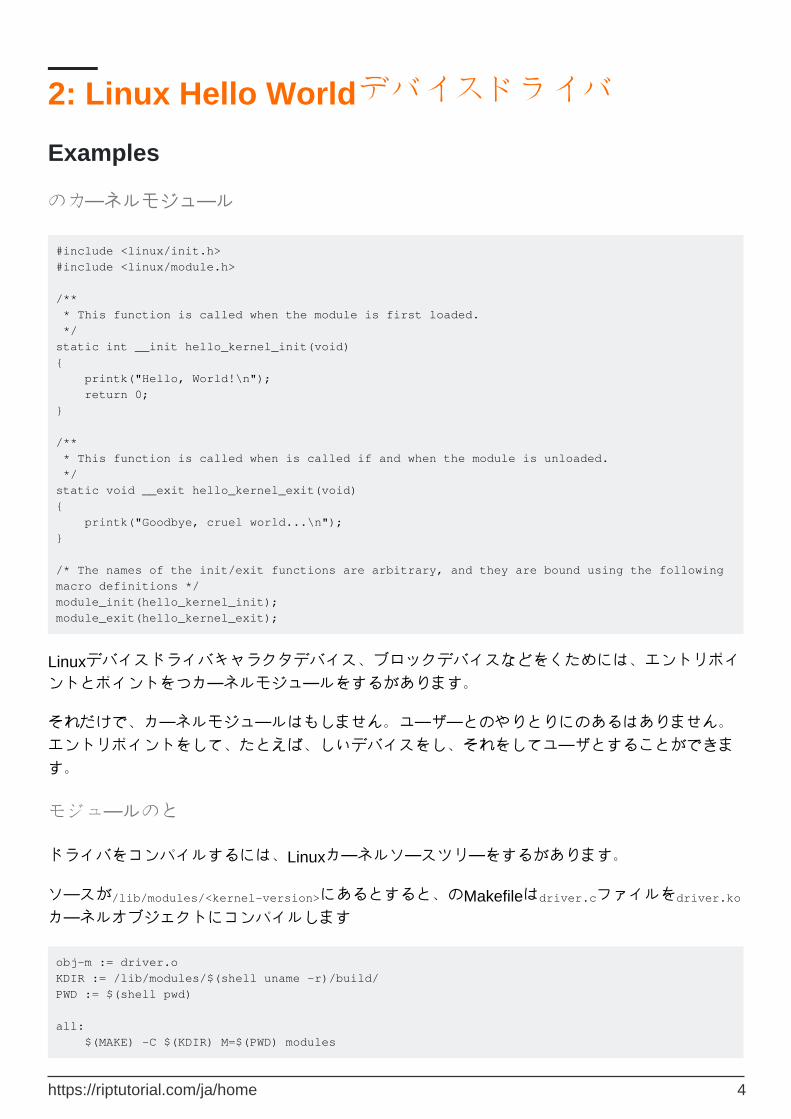
2: Linux Hello Worldデバイスドライバ
Examples
のカーネルモジュール
#include <linux/init.h> #include <linux/module.h> /** * This function is called when the module is first loaded. */ static int __init hello_kernel_init(void) { printk("Hello, World!\n"); return 0; } /** * This function is called when is called if and when the module is unloaded. */ static void __exit hello_kernel_exit(void) { printk("Goodbye, cruel world...\n"); } /* The names of the init/exit functions are arbitrary, and they are bound using the following macro definitions */ module_init(hello_kernel_init); module_exit(hello_kernel_exit);
Linuxデバイスドライバキャラクタデバイス、ブロックデバイスなどをくためには、エントリポイントとポイントをつカーネルモジュールをするがあります。
それだけで、カーネルモジュールはもしません。ユーザーとのやりとりにのあるはありません。エントリポイントをして、たとえば、しいデバイスをし、それをしてユーザとすることができます。
モジュールのと
ドライバをコンパイルするには、Linuxカーネルソースツリーをするがあります。
ソースが/lib/modules/<kernel-version>にあるとすると、のMakefileはdriver.cファイルをdriver.ko
カーネルオブジェクトにコンパイルします
obj-m := driver.o KDIR := /lib/modules/$(shell uname -r)/build/ PWD := $(shell pwd) all: $(MAKE) -C $(KDIR) M=$(PWD) modules
https://riptutorial.com/ja/home 4
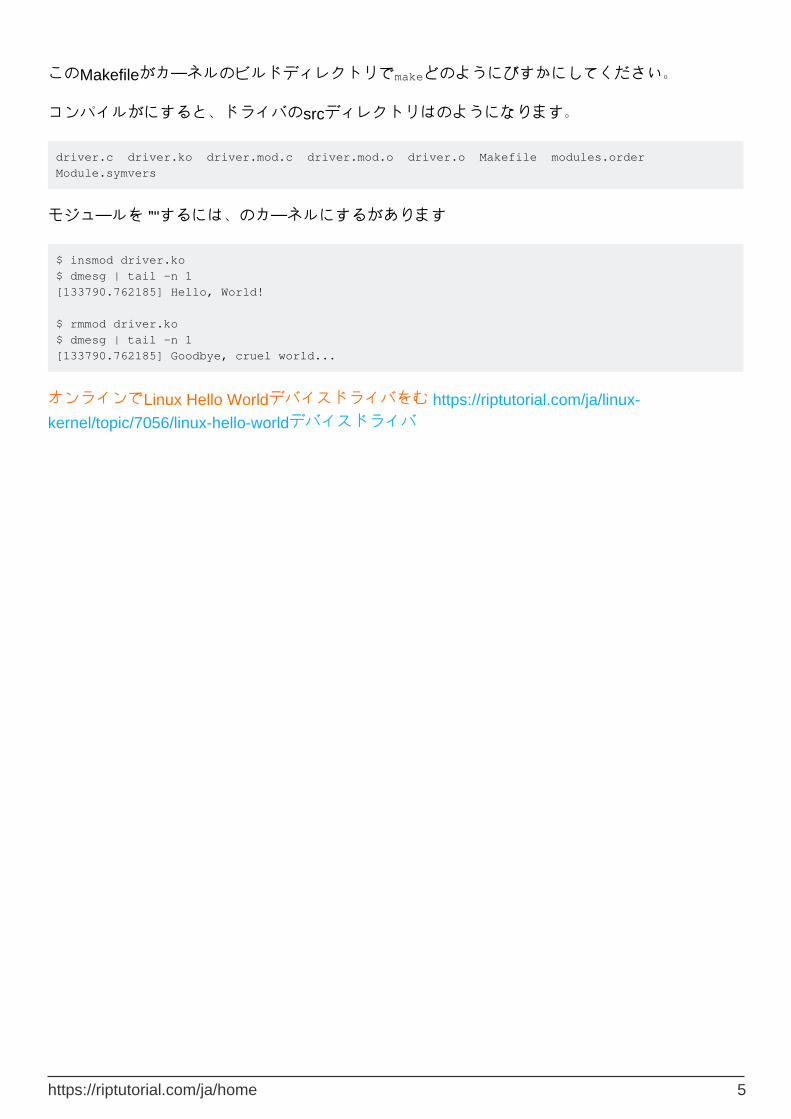
このMakefileがカーネルのビルドディレクトリでmakeどのようにびすかにしてください。
コンパイルがにすると、ドライバのsrcディレクトリはのようになります。
driver.c driver.ko driver.mod.c driver.mod.o driver.o Makefile modules.order Module.symvers
モジュールを ""するには、のカーネルにするがあります
$ insmod driver.ko $ dmesg | tail -n 1 [133790.762185] Hello, World! $ rmmod driver.ko $ dmesg | tail -n 1 [133790.762185] Goodbye, cruel world...
オンラインでLinux Hello Worldデバイスドライバをむ https://riptutorial.com/ja/linux-
kernel/topic/7056/linux-hello-worldデバイスドライバ
https://riptutorial.com/ja/home 5
3: LinuxきパイプFIFO
Examples
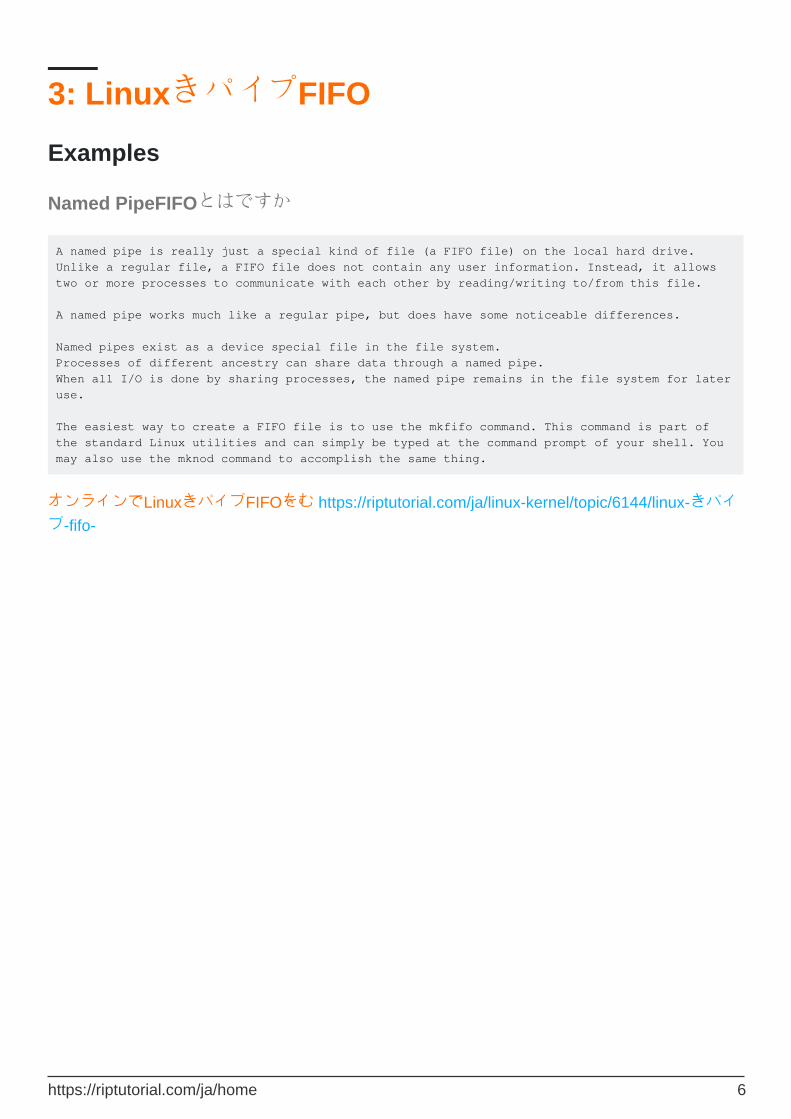
Named PipeFIFOとはですか
A named pipe is really just a special kind of file (a FIFO file) on the local hard drive. Unlike a regular file, a FIFO file does not contain any user information. Instead, it allows two or more processes to communicate with each other by reading/writing to/from this file. A named pipe works much like a regular pipe, but does have some noticeable differences. Named pipes exist as a device special file in the file system. Processes of different ancestry can share data through a named pipe. When all I/O is done by sharing processes, the named pipe remains in the file system for later use. The easiest way to create a FIFO file is to use the mkfifo command. This command is part of the standard Linux utilities and can simply be typed at the command prompt of your shell. You may also use the mknod command to accomplish the same thing.
オンラインでLinuxきパイプFIFOをむ https://riptutorial.com/ja/linux-kernel/topic/6144/linux-きパイプ-fifo-
https://riptutorial.com/ja/home 6
4: イベントのトレース
Examples
I2Cイベントのトレース
はdebugfsが/sys/kernel/debugにマウントされているとしてい/sys/kernel/debug
そうでないは、
mount -t debugfs none /sys/kernel/debug
トレースディレクトリにします。
cd /sys/kernel/debug/tracing/
ファンクショントレーサがになっていることをします。
echo nop > current_tracer
すべてのI2Cイベントをにする
echo 1 > events/i2c/enable
トレースがになっていることをします。
echo 1 > tracing_on
トレースメッセージは、 /sys/kernel/debug/tracing/traceでできます
... i2c_write: i2c-5 #0 a=044 f=0000 l=2 [02-14]
... i2c_read: i2c-5 #1 a=044 f=0001 l=4
... i2c_reply: i2c-5 #1 a=044 f=0001 l=4 [33-00-00-00]
... i2c_result: i2c-5 n=2 ret=2
トレースイベントユーザスペースAPIのドキュメントは、カーネルソースのDocumentation/trace/events.txtファイルにあります。
オンラインでイベントのトレースをむ https://riptutorial.com/ja/linux-kernel/topic/3466/イベントのトレース
https://riptutorial.com/ja/home 7
5: カーネルスレッドのと
き
このトピックでは、カーネルスレッドをしてするについてします。
Examples
カーネルスレッドの
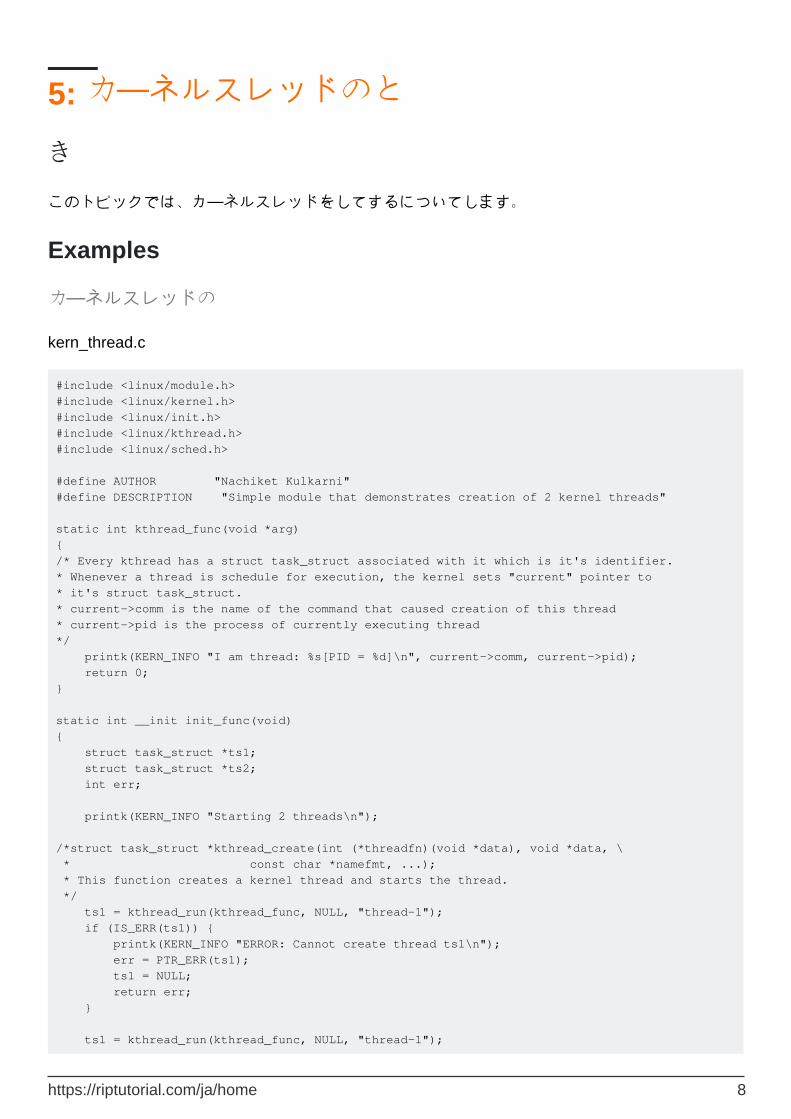
kern_thread.c
#include <linux/module.h> #include <linux/kernel.h> #include <linux/init.h> #include <linux/kthread.h> #include <linux/sched.h> #define AUTHOR "Nachiket Kulkarni" #define DESCRIPTION "Simple module that demonstrates creation of 2 kernel threads" static int kthread_func(void *arg) { /* Every kthread has a struct task_struct associated with it which is it's identifier. * Whenever a thread is schedule for execution, the kernel sets "current" pointer to * it's struct task_struct. * current->comm is the name of the command that caused creation of this thread * current->pid is the process of currently executing thread */ printk(KERN_INFO "I am thread: %s[PID = %d]\n", current->comm, current->pid); return 0; } static int __init init_func(void) { struct task_struct *ts1; struct task_struct *ts2; int err; printk(KERN_INFO "Starting 2 threads\n"); /*struct task_struct *kthread_create(int (*threadfn)(void *data), void *data, \ * const char *namefmt, ...); * This function creates a kernel thread and starts the thread. */ ts1 = kthread_run(kthread_func, NULL, "thread-1"); if (IS_ERR(ts1)) { printk(KERN_INFO "ERROR: Cannot create thread ts1\n"); err = PTR_ERR(ts1); ts1 = NULL; return err; } ts1 = kthread_run(kthread_func, NULL, "thread-1");
https://riptutorial.com/ja/home 8
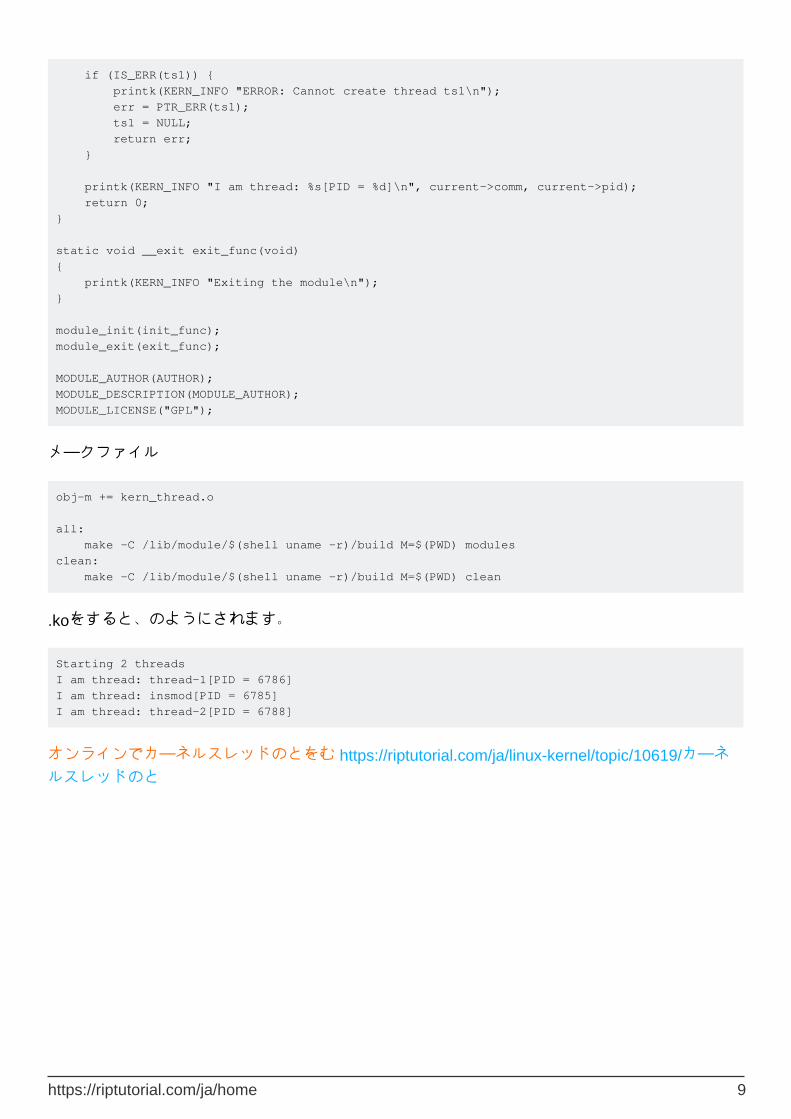
if (IS_ERR(ts1)) { printk(KERN_INFO "ERROR: Cannot create thread ts1\n"); err = PTR_ERR(ts1); ts1 = NULL; return err; } printk(KERN_INFO "I am thread: %s[PID = %d]\n", current->comm, current->pid); return 0; } static void __exit exit_func(void) { printk(KERN_INFO "Exiting the module\n"); } module_init(init_func); module_exit(exit_func); MODULE_AUTHOR(AUTHOR); MODULE_DESCRIPTION(MODULE_AUTHOR); MODULE_LICENSE("GPL");
メークファイル
obj-m += kern_thread.o all: make -C /lib/module/$(shell uname -r)/build M=$(PWD) modules clean: make -C /lib/module/$(shell uname -r)/build M=$(PWD) clean
.koをすると、のようにされます。
Starting 2 threads I am thread: thread-1[PID = 6786] I am thread: insmod[PID = 6785] I am thread: thread-2[PID = 6788]
オンラインでカーネルスレッドのとをむ https://riptutorial.com/ja/linux-kernel/topic/10619/カーネルスレッドのと
https://riptutorial.com/ja/home 9
6: フォークシステムコール
Examples
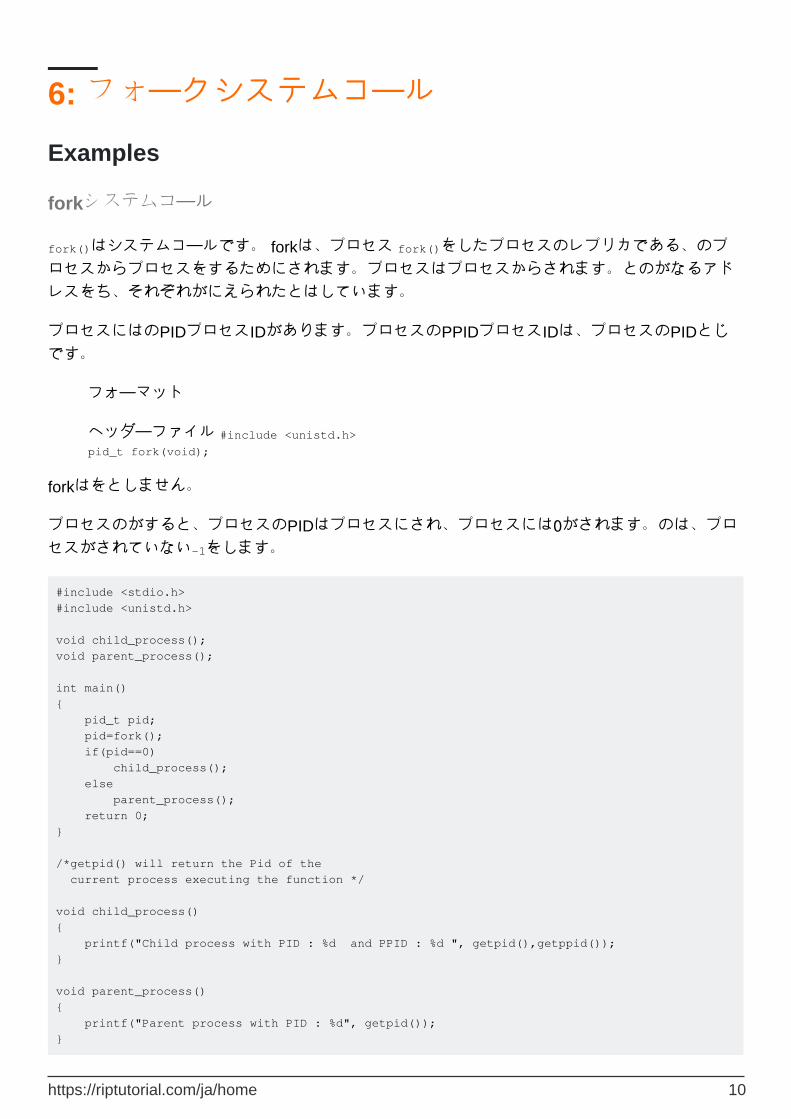
forkシステムコール
fork()はシステムコールです。 forkは、プロセス fork()をしたプロセスのレプリカである、のプロセスからプロセスをするためにされます。プロセスはプロセスからされます。とのがなるアドレスをち、それぞれがにえられたとはしています。
プロセスにはのPIDプロセスIDがあります。プロセスのPPIDプロセスIDは、プロセスのPIDとじです。
フォーマット
ヘッダーファイル #include <unistd.h> pid_t fork(void);
forkはをとしません。
プロセスのがすると、プロセスのPIDはプロセスにされ、プロセスには0がされます。のは、プロセスがされていない-1をします。
#include <stdio.h> #include <unistd.h> void child_process(); void parent_process(); int main() { pid_t pid; pid=fork(); if(pid==0) child_process(); else parent_process(); return 0; } /*getpid() will return the Pid of the current process executing the function */ void child_process() { printf("Child process with PID : %d and PPID : %d ", getpid(),getppid()); } void parent_process() { printf("Parent process with PID : %d", getpid()); }
https://riptutorial.com/ja/home 10

とからのprintfステートメントのシーケンスは、システムにするスケジューリング・メカニズムにします。
オンラインでフォークシステムコールをむ https://riptutorial.com/ja/linux-kernel/topic/5199/フォークシステムコール
https://riptutorial.com/ja/home 11
7: しいをつける。
き
これはのLinuxカーネルのドキュメントのいくつかをし、 tovalds/linuxにのバージョンのドキュメントへのリンクをするべきです。 MAINTAINERSファイル、 linux-kernelメーリングリスト、 git log 、 scripts/get-maintainerをして、なをするなにしていることをすることです。
Examples
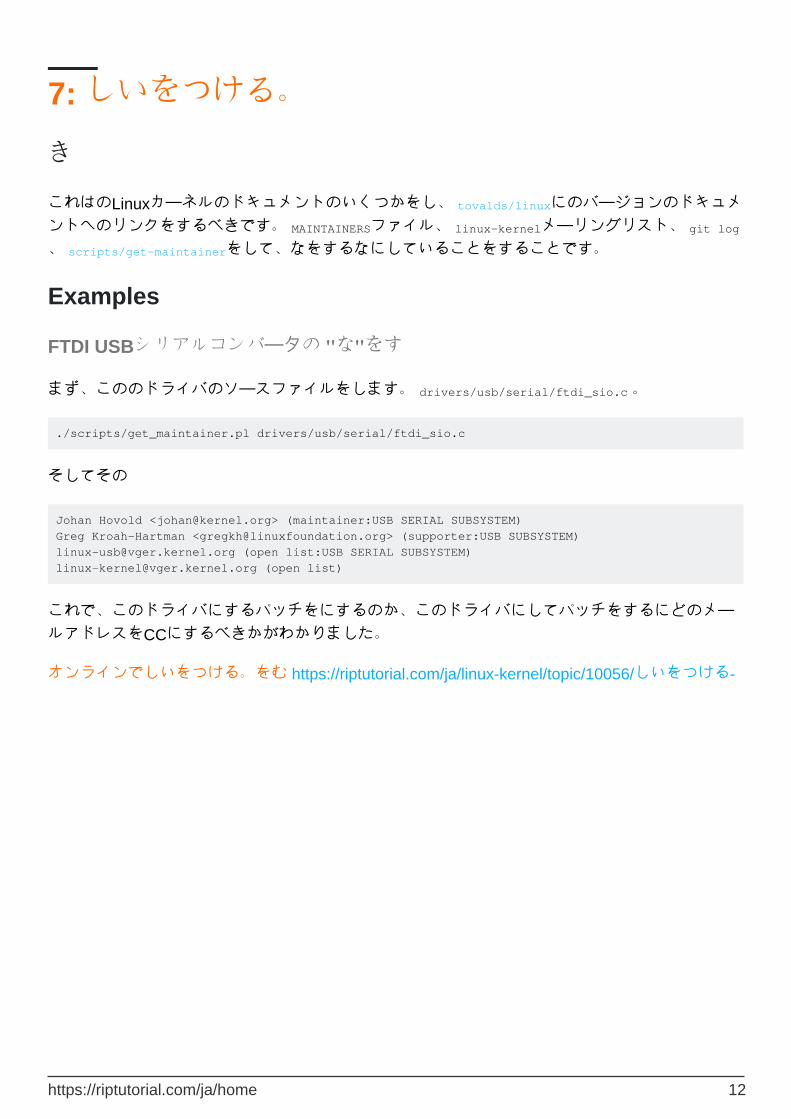
FTDI USBシリアルコンバータの "な"をす
まず、こののドライバのソースファイルをします。 drivers/usb/serial/ftdi_sio.c 。
./scripts/get_maintainer.pl drivers/usb/serial/ftdi_sio.c
そしてその
Johan Hovold <[email protected]> (maintainer:USB SERIAL SUBSYSTEM) Greg Kroah-Hartman <[email protected]> (supporter:USB SUBSYSTEM) [email protected] (open list:USB SERIAL SUBSYSTEM) [email protected] (open list)
これで、このドライバにするパッチをにするのか、このドライバにしてパッチをするにどのメールアドレスをCCにするべきかがわかりました。
オンラインでしいをつける。をむ https://riptutorial.com/ja/linux-kernel/topic/10056/しいをつける-
https://riptutorial.com/ja/home 12

クレジット
S. No
Contributors
1 linux-kernelをいめるCommunity, EsmaeelE, Marek Skiba, Matt, Tejus Prasad, vinay hunachyal
2Linux Hello Worldデバイスドライバ
Gilad Naaman
3 LinuxきパイプFIFO chait
4 イベントのトレース sergej
5カーネルスレッドのと
nachiketkulk
6フォークシステムコール
chait, Dilip Kumar
7 しいをつける。 DevNull, EsmaeelE
https://riptutorial.com/ja/home 13


![Alchemy CATALYST 9.0 製品ライセンスについて - …jp.xlsoft.com/documents/catalyst/Alchemy_Catalyst_9.0...Windows の [スタート] ボタンから [すべてのプログラム]](https://static.fdocumentos.com/doc/165x107/5ecdf88c08634901be1f4371/alchemy-catalyst-90-eff-jp-windows-ff.jpg)